

Driveway Security Bollards
Telescopic, automatic & static driveway bollards to protect your vehicle from theft and nuisance parking. We supply & install within 3 days, guaranteed. Get in touch for a free quote today.
Driveway Security Bollards
Telescopic, automatic & static driveway bollards to protect your vehicle from theft and nuisance parking. We supply & install within 3 days, guaranteed. Get in touch for a free quote today.
Driveway Security Bollards
Telescopic, automatic & static driveway bollards to protect your vehicle from theft and nuisance parking. We supply & install within 3 days, guaranteed. Get in touch for a free quote today.
Explore Our Range of Driveway Bollards & Security Posts
Looking for driveway bollards to protect your vehicle? Our range of security posts and bollards provide heavy-duty protection against theft and unauthorised parking. From manual telescopic bollards and anti-parking posts, to convenient automatic driveway bollards, we supply and install the right solution for your property. Serving London, Essex, Kent, Surrey and Birmingham.
✔ 0% Financing Options
✔ Installation Available
✔ Insurance Approved

Best Sellers

Telescopic Security Bollards
Our most popular choice for home driveways. Telescopic bollards retract flush into the ground when not in use, then lock securely upright to block vehicle access. Manually operated with a key.

Anti-Parking
Anti-Parking Bollards
Fold-down parking posts designed to stop nuisance parking and protect your space. Quick to operate. Simply unlock, fold flat, and drive over. Ideal for reserved bays and shared driveways

Automatic
Automatic Driveway Bollards
Premium remote-controlled bollards that raise and lower at the push of a button. No bending down, no keys — just press your fob and drive in. Perfect for frequent use or mobility needs.

Lift-Assist
Lift-Assist Telescopic Bollards
Gas-assisted telescopic bollards that make operation effortless. The lift mechanism does the heavy lifting for you — ideal if you want manual control without the physical effort.

Heavy Duty
Heavy-Duty Telescopic
Heavy-duty telescopic bollards for those looking for extra protection Protect your driveway against vehicle theft and reduce insurance premiums. Get in touch for a free quote today.
Explore Our Range of Driveway Bollards & Security Posts
Looking for driveway bollards to protect your vehicle? Our range of security posts and bollards provide heavy-duty protection against theft and unauthorised parking. From manual telescopic bollards and anti-parking posts, to convenient automatic driveway bollards, we supply and install the right solution for your property. Serving London, Essex, Kent, Surrey and Birmingham.
✔ 0% Financing Options
✔ Installation Available
✔ Insurance Approved
✔ Next-Day Service
Best Sellers
Telescopic Security Bollards
Our most popular choice for home driveways. Telescopic bollards retract flush into the ground when not in use, then lock securely upright to block vehicle access. Manually operated with a key.
Anti-Parking
Anti-Parking Bollards
Fold-down parking posts designed to stop nuisance parking and protect your space. Quick to operate. Simply unlock, fold flat, and drive over. Ideal for reserved bays and shared driveways
Automatic
Automatic Driveway Bollards
Premium remote-controlled bollards that raise and lower at the push of a button. No bending down, no keys — just press your fob and drive in. Perfect for frequent use or mobility needs.
Lift-Assist
Lift-Assist Telescopic Bollards
Gas-assisted telescopic bollards that make operation effortless. The lift mechanism does the heavy lifting for you — ideal if you want manual control without the physical effort.
Heavy Duty
Heavy-Duty Telescopic
Heavy-duty telescopic bollards for those looking for extra protection Protect your driveway against vehicle theft and reduce insurance premiums. Get in touch for a free quote today.
Explore Our Range of Driveway Bollards & Security Posts
Looking for driveway bollards to protect your vehicle? Our range of security posts and bollards provide heavy-duty protection against theft and unauthorised parking. From manual telescopic bollards and anti-parking posts, to convenient automatic driveway bollards, we supply and install the right solution for your property. Serving London, Essex, Kent, Surrey and Birmingham.
✔ 0% Financing Options
✔ Installation Available
✔ Insurance Approved
Best Sellers
Telescopic Security Bollards
Our most popular choice for home driveways. Telescopic bollards retract flush into the ground when not in use, then lock securely upright to block vehicle access. Manually operated with a key.
Anti-Parking
Anti-Parking Bollards
Fold-down parking posts designed to stop nuisance parking and protect your space. Quick to operate. Simply unlock, fold flat, and drive over. Ideal for reserved bays and shared driveways
Automatic
Automatic Driveway Bollards
Premium remote-controlled bollards that raise and lower at the push of a button. No bending down, no keys — just press your fob and drive in. Perfect for frequent use or mobility needs.
Lift-Assist
Lift-Assist Telescopic Bollards
Gas-assisted telescopic bollards that make operation effortless. The lift mechanism does the heavy lifting for you — ideal if you want manual control without the physical effort.
Heavy Duty
Heavy-Duty Telescopic
Heavy-duty telescopic bollards for those looking for extra protection Protect your driveway against vehicle theft and reduce insurance premiums. Get in touch for a free quote today.
Why Choose Wentworth Protection?
See why we're the #1 rated Driveway Security provider in the South East & Midlands.
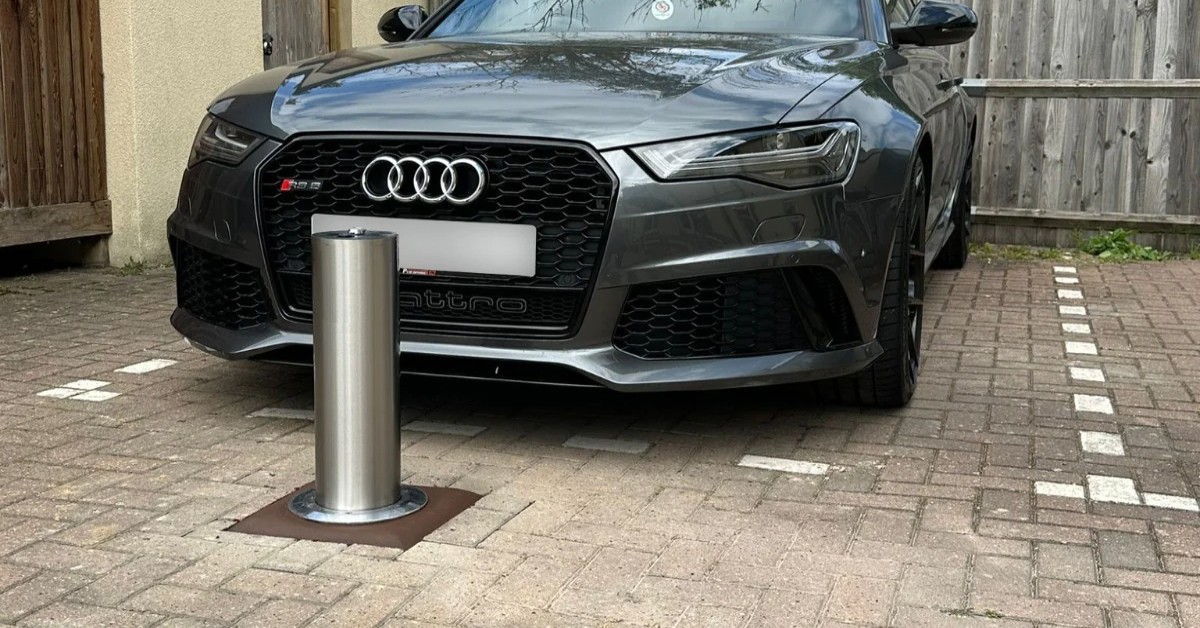
Retractable Telescopic Driveway Bollards
Telescopic bollards are the UK's most popular choice for driveway security. These manually-operated, retractable posts return flush into the ground when not in use, then lock securely upright to block vehicle access. We supply and install telescopic bollards across London, Essex, Kent, Surrey, and Birmingham, with most installations completed in under 2 hours.
✔ 0% Financing Options
✔ Installation Available
✔ Insurance Approved
Best Seller
Premium Stainless Steel Bollard
500mm anti-theft telescopic bollard.
from £650 inc. VAT
or 3 x £216.67 with Klarna

Installation Available
Medium Stainless Steel Bollard
710mm anti-theft telescopic bollard.
from £1,049 inc. VAT
or 3 x £349.67 with Klarna

Installation Available
Large Stainless Steel Bollard
900mm anti-theft telescopic bollard.
from £1,249 inc. VAT
or 3 x £416.33 with Klarna

Installation Available
Black Steel Telescopic Bollard
500mm powder-coated anti-theft bollard.
from £649 inc. VAT
or 3 x £216.33 with Klarna

Installation Available
Red Steel Telescopic Bollard
500mm powder-coated anti-theft bollard.
from £649 inc. VAT
or 3 x £216.33 with Klarna

Installation Available
White Steel Telescopic Bollard
500mm powder-coated anti-theft bollard.
from £649 inc. VAT
or 3 x £216.33 with Klarna

Installation Available
Yellow Steel Telescopic Bollard
500mm powder-coated anti-theft bollard.
from £649 inc. VAT
or 3 x £216.33 with Klarna

Installation Available
Silver Steel Telescopic Bollard
500mm powder-coated anti-theft bollard.
from £649 inc. VAT
or 3 x £216.33 with Klarna
Retractable Telescopic Driveway Bollards
Telescopic bollards are the UK's most popular choice for driveway security. These manually-operated, retractable posts return flush into the ground when not in use, then lock securely upright to block vehicle access. We supply and install telescopic bollards across London, Essex, Kent, Surrey, and Birmingham, with most installations completed in under 2 hours.
✔ 0% Financing Options
✔ Installation Available
✔ Insurance Approved
✔ Next-Day Service
Best Seller
Premium Stainless Steel Bollard
500mm anti-theft telescopic bollard.
from £650 inc. VAT
or 3 x £216.67 with Klarna
Installation Available
Medium Stainless Steel Bollard
710mm anti-theft telescopic bollard.
from £1,049 inc. VAT
or 3 x £349.67 with Klarna
Installation Available
Large Stainless Steel Bollard
900mm anti-theft telescopic bollard.
from £1,249 inc. VAT
or 3 x £416.33 with Klarna
Installation Available
Black Steel Telescopic Bollard
500mm powder-coated anti-theft bollard.
from £649 inc. VAT
or 3 x £216.33 with Klarna
Installation Available
Red Steel Telescopic Bollard
500mm powder-coated anti-theft bollard.
from £649 inc. VAT
or 3 x £216.33 with Klarna
Installation Available
White Steel Telescopic Bollard
500mm powder-coated anti-theft bollard.
from £649 inc. VAT
or 3 x £216.33 with Klarna
Installation Available
Yellow Steel Telescopic Bollard
500mm powder-coated anti-theft bollard.
from £649 inc. VAT
or 3 x £216.33 with Klarna
Installation Available
Silver Steel Telescopic Bollard
500mm powder-coated anti-theft bollard.
from £649 inc. VAT
or 3 x £216.33 with Klarna
Retractable Telescopic Driveway Bollards
Telescopic bollards are the UK's most popular choice for driveway security. These manually-operated, retractable posts return flush into the ground when not in use, then lock securely upright to block vehicle access. We supply and install telescopic bollards across London, Essex, Kent, Surrey, and Birmingham, with most installations completed in under 2 hours.
✔ 0% Financing Options
✔ Installation Available
✔ Insurance Approved
Best Seller
Premium Stainless Steel Bollard
500mm anti-theft telescopic bollard.
from £650 inc. VAT
or 3 x £216.67 with Klarna
Installation Available
Medium Stainless Steel Bollard
710mm anti-theft telescopic bollard.
from £1,049 inc. VAT
or 3 x £349.67 with Klarna
Installation Available
Large Stainless Steel Bollard
900mm anti-theft telescopic bollard.
from £1,249 inc. VAT
or 3 x £416.33 with Klarna
Installation Available
Black Steel Telescopic Bollard
500mm powder-coated anti-theft bollard.
from £649 inc. VAT
or 3 x £216.33 with Klarna
Installation Available
Red Steel Telescopic Bollard
500mm powder-coated anti-theft bollard.
from £649 inc. VAT
or 3 x £216.33 with Klarna
Installation Available
White Steel Telescopic Bollard
500mm powder-coated anti-theft bollard.
from £649 inc. VAT
or 3 x £216.33 with Klarna
Installation Available
Yellow Steel Telescopic Bollard
500mm powder-coated anti-theft bollard.
from £649 inc. VAT
or 3 x £216.33 with Klarna
Installation Available
Silver Steel Telescopic Bollard
500mm powder-coated anti-theft bollard.
from £649 inc. VAT
or 3 x £216.33 with Klarna
Remote-Controlled Automatic Driveway Bollards
Automatic bollards offer effortless driveway security at the push of a button. These electric-powered posts raise and lower via remote control or key fob. No bending, no keys, no physical effort. Ideal for busy households, shared driveways, or anyone with mobility concerns. We supply and install automatic bollards across London, Essex, Kent, Surrey and Birmingham.
✔ 0% Financing Options
✔ Installation Available
✔ Insurance Approved

Best Seller
Installation Available
DriveGuard Auto Battery Powered Automatic Bollard
Fob-controlled, fully automatic, high-security automatic driveway bollard.
from £1,799 inc. VAT
or 3 x £599.67 with Klarna
Remote-Controlled Automatic Driveway Bollards
Automatic bollards offer effortless driveway security at the push of a button. These electric-powered posts raise and lower via remote control or key fob. No bending, no keys, no physical effort. Ideal for busy households, shared driveways, or anyone with mobility concerns. We supply and install automatic bollards across London, Essex, Kent, Surrey and Birmingham.
✔ 0% Financing Options
✔ Installation Available
✔ Insurance Approved
✔ Next-Day Service

Best Seller
Installation Available
DriveGuard Auto Battery Powered Automatic Bollard
Fob-controlled, fully automatic, high-security automatic driveway bollard.
from £1,799 inc. VAT
or 3 x £599.67 with Klarna
Remote-Controlled Automatic Driveway Bollards
Automatic bollards offer effortless driveway security at the push of a button. These electric-powered posts raise and lower via remote control or key fob. No bending, no keys, no physical effort. Ideal for busy households, shared driveways, or anyone with mobility concerns. We supply and install automatic bollards across London, Essex, Kent, Surrey and Birmingham.
✔ 0% Financing Options
✔ Installation Available
✔ Insurance Approved
Best Seller
Installation Available
DriveGuard Auto Battery Powered Automatic Bollard
Fob-controlled, fully automatic, high-security automatic driveway bollard.
from £1,799 inc. VAT
or 3 x £599.67 with Klarna
Why Install Driveway Security Bollards?

24/7 Protection & Deterrence
Deter thieves and stop vehicle theft before it happens. Bollards act as a visible, physical barrier — keeping your car safe day and night.

Ram & Tamper Proof

Lower Insurance Cost

Why Install Driveway Security Bollards?
24/7 Protection & Deterrence
Deter thieves and stop vehicle theft before it happens. Bollards act as a visible, physical barrier — keeping your car safe day and night.
Ram & Tamper Proof
Lower Insurance Cost
Fold-Down Driveway Posts & Parking Protection
Anti-parking bollards are fold-down posts designed to stop unauthorised vehicles blocking your driveway or parking space. Simply unlock, fold flat, and drive over. Then fold back up when you leave. They're the most affordable bollard option to secure your driveway and ideal for reserved bays, shared driveways, and anywhere you need to deter nuisance parking. We supply and install across London, Essex, Kent, Surrey and Birmingham.
✔ 0% Financing Options
✔ Installation Available
✔ Insurance Approved

Best Seller
Installation Available
DriveGuard Park - Steel
Zinc-plated fold-down anti-parking post.
from £200 inc. VAT
or 3 x £66.67 with Klarna

Installation Available
DriveGuard Park - Yellow
Powder-coated fold-down anti-parking post.
from £200 inc. VAT
or 3 x £66.67 with Klarna
Installation Available
Yellow Heavy-Duty Parking Barrier
Heavy-Duty folding anti-parking post.
from £400 inc. VAT
or 3 x £133.33 with Klarna

High Vis
Installation Available
High-Vis Heavy Duty Parking Bollard
Yellow & black heavy-duty telescopic post.
from £499 inc. VAT
or 3 x £166.33 with Klarna

Installation Available
High Vis Folding Parking Post
Yellow & black fold-down anti-parking post.
from £499 inc. VAT
or 3 x £166.33 with Klarna
Fold-Down Driveway Posts & Parking Protection
Anti-parking bollards are fold-down posts designed to stop unauthorised vehicles blocking your driveway or parking space. Simply unlock, fold flat, and drive over. Then fold back up when you leave. They're the most affordable bollard option to secure your driveway and ideal for reserved bays, shared driveways, and anywhere you need to deter nuisance parking. We supply and install across London, Essex, Kent, Surrey and Birmingham.
✔ 0% Financing Options
✔ Installation Available
✔ Insurance Approved
✔ Next-Day Service
Best Seller
Installation Available
DriveGuard Park - Steel
Zinc-plated fold-down anti-parking post.
from £200 inc. VAT
or 3 x £66.67 with Klarna
Installation Available
DriveGuard Park - Yellow
Powder-coated fold-down anti-parking post.
from £200 inc. VAT
or 3 x £66.67 with Klarna
Installation Available
Yellow Heavy-Duty Parking Barrier
Heavy-Duty folding anti-parking post.
from £400 inc. VAT
or 3 x £133.33 with Klarna
High Vis
Installation Available
High-Vis Heavy Duty Parking Bollard
Yellow & black heavy-duty telescopic post.
from £499 inc. VAT
or 3 x £166.33 with Klarna
Installation Available
High Vis Folding Parking Post
Yellow & black fold-down anti-parking post.
from £499 inc. VAT
or 3 x £166.33 with Klarna
Fold-Down Driveway Posts & Parking Protection
Anti-parking bollards are fold-down posts designed to stop unauthorised vehicles blocking your driveway or parking space. Simply unlock, fold flat, and drive over. Then fold back up when you leave. They're the most affordable bollard option to secure your driveway and ideal for reserved bays, shared driveways, and anywhere you need to deter nuisance parking. We supply and install across London, Essex, Kent, Surrey and Birmingham.
✔ 0% Financing Options
✔ Installation Available
✔ Insurance Approved
Best Seller
Installation Available
DriveGuard Park - Steel
Zinc-plated fold-down anti-parking post.
from £200 inc. VAT
or 3 x £66.67 with Klarna
Installation Available
DriveGuard Park - Yellow
Powder-coated fold-down anti-parking post.
from £200 inc. VAT
or 3 x £66.67 with Klarna
Installation Available
Yellow Heavy-Duty Parking Barrier
Heavy-Duty folding anti-parking post.
from £400 inc. VAT
or 3 x £133.33 with Klarna
High Vis
Installation Available
High-Vis Heavy Duty Parking Bollard
Yellow & black heavy-duty telescopic post.
from £499 inc. VAT
or 3 x £166.33 with Klarna
Installation Available
High Vis Folding Parking Post
Yellow & black fold-down anti-parking post.
from £499 inc. VAT
or 3 x £166.33 with Klarna
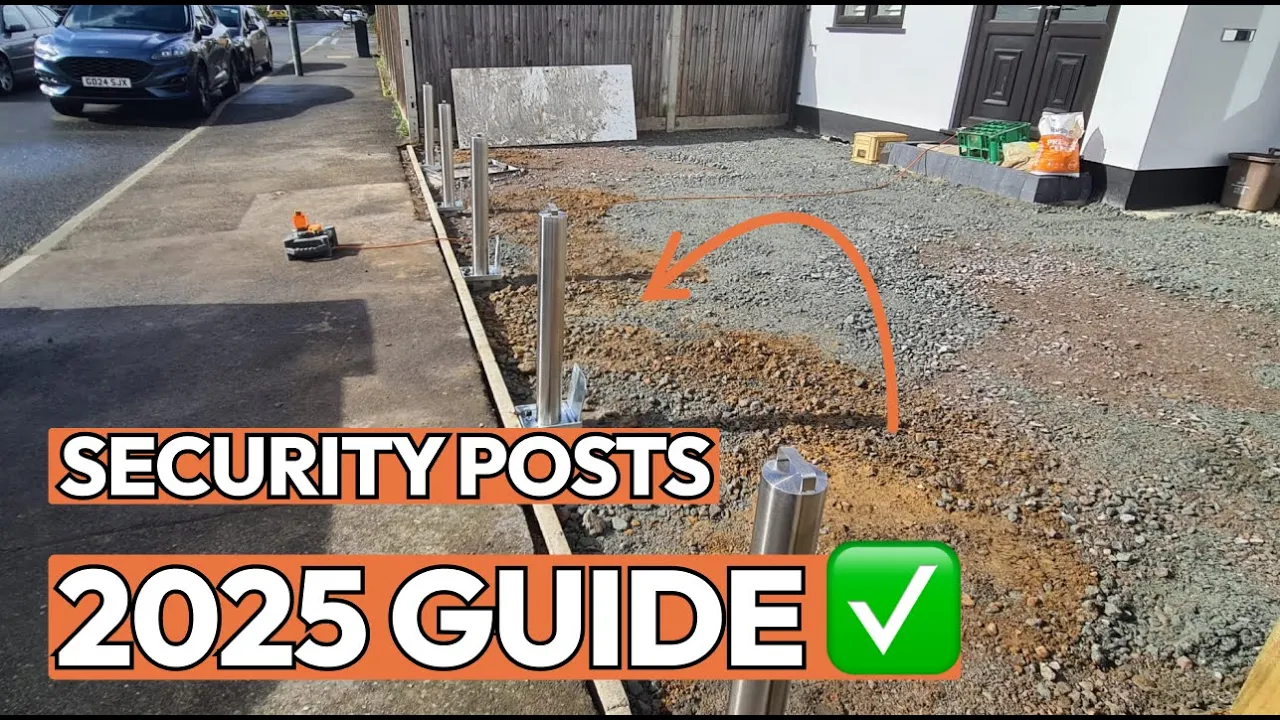
Driveway Bollards Buyers Guide - 2026
Buying bollards can be confusing. We've put together a handy buyers guide to help you make the best choice for your driveway, whether that's fully automatic bollards or simply anti-parking posts. Still not sure?
Get in touch with our team below for 100% free advice.
Gas-Assisted Driveway Bollards
Lift-assist telescopic bollards combine the security of a telescopic post with effortless gas-assisted operation. The built-in gas strut does the heavy lifting for you — simply unlock and the bollard rises smoothly into position. Ideal for anyone who wants driveway security without the physical effort. We supply and install across London, Essex, Kent, Surrey and Birmingham.
✔ 0% Financing Options
✔ Installation Available
✔ Insurance Approved
Best Seller
Installation Available
Stainless Steel Lift-Assist Bollard
Stainless steel, hydraulic lift-assist bollard.
from £1,449 inc. VAT
or 3 x £483 with Klarna

Installation Available
Black Steel Lift-Assist Bollard
Black powder-coated hydraulic lift-assist bollard.
from £1,349 inc. VAT
or 3 x £449.67 with Klarna

Budget-Friendly
Galvanised Finish Lift-Assist Bollard
Entry-level galvanised lift-assist bollard.
from £1,349 inc. VAT
or 3 x £449.67 with Klarna
Gas-Assisted Driveway Bollards
Lift-assist telescopic bollards combine the security of a telescopic post with effortless gas-assisted operation. The built-in gas strut does the heavy lifting for you — simply unlock and the bollard rises smoothly into position. Ideal for anyone who wants driveway security without the physical effort. We supply and install across London, Essex, Kent, Surrey and Birmingham.
✔ 0% Financing Options
✔ Installation Available
✔ Insurance Approved
✔ Next-Day Service
Best Seller
Installation Available
Stainless Steel Lift-Assist Bollard
Stainless steel, hydraulic lift-assist bollard.
from £1,449 inc. VAT
or 3 x £483 with Klarna
Installation Available
Black Steel Lift-Assist Bollard
Black powder-coated hydraulic lift-assist bollard.
from £1,349 inc. VAT
or 3 x £449.67 with Klarna
Budget-Friendly
Galvanised Finish Lift-Assist Bollard
Entry-level galvanised lift-assist bollard.
from £1,349 inc. VAT
or 3 x £449.67 with Klarna
Gas-Assisted Driveway Bollards
Lift-assist telescopic bollards combine the security of a telescopic post with effortless gas-assisted operation. The built-in gas strut does the heavy lifting for you — simply unlock and the bollard rises smoothly into position. Ideal for anyone who wants driveway security without the physical effort. We supply and install across London, Essex, Kent, Surrey and Birmingham.
✔ 0% Financing Options
✔ Installation Available
✔ Insurance Approved
Best Seller
Installation Available
Stainless Steel Lift-Assist Bollard
Stainless steel, hydraulic lift-assist bollard.
from £1,449 inc. VAT
or 3 x £483 with Klarna
Installation Available
Black Steel Lift-Assist Bollard
Black powder-coated hydraulic lift-assist bollard.
from £1,349 inc. VAT
or 3 x £449.67 with Klarna
Budget-Friendly
Galvanised Finish Lift-Assist Bollard
Entry-level galvanised lift-assist bollard.
from £1,349 inc. VAT
or 3 x £449.67 with Klarna
Why Install Driveway Security Bollards?
24/7 Protection & Deterrence
Deter thieves and stop vehicle theft before it happens. Bollards act as a visible, physical barrier — keeping your car safe day and night.
Ram & Tamper Proof
Lower Insurance Cost
Why Install Driveway Security Bollards?
24/7 Protection & Deterrence
Deter thieves and stop vehicle theft before it happens. Bollards act as a visible, physical barrier — keeping your car safe day and night.
Ram & Tamper Proof
Lower Insurance Cost
Frequently Asked Questions
Are telescopic and retractable bollards the same thing?
Yes — telescopic bollards and retractable bollards are the same product. Both terms describe bollards that retract into the ground when not in use. "Telescopic" refers to how the bollard slides into a sleeve, while "retractable" simply means it can be lowered.
How much do driveway bollards cost?
Prices vary depending on the type. Basic fold-down posts start around £300 installed, telescopic bollards typically range from £600–£1,000, and automatic bollards start from around £2,000 including installation. We provide free quotes tailored to your property.
Can bollards be installed on block paving or resin driveways?
Yes — we install bollards on all driveway surfaces including block paving, tarmac, concrete, gravel, and resin. The installation involves core-drilling a hole for the ground sleeve, which works on virtually any hard surface.
Which type of bollard is best for my driveway?
It depends on how often you use your driveway and your budget. Telescopic bollards are our most popular choice — affordable, secure, and easy to operate. Automatic bollards suit busy households or those with mobility concerns. We offer free advice to help you choose.
What areas do you cover for bollard installation?
We supply and install driveway bollards across London, Essex, Kent, Surrey, and Birmingham. Most installations are completed within a week of your quote being approved. Contact us to check availability in your area.
Can driveway bollards lower my car insurance?
Yes — many insurers offer discounts of 5–15% for approved security measures. Bollards that meet Sold Secure or LPS 1175 standards are recognised by most insurers. We can provide documentation for your insurance company on request.
What's the difference between telescopic and automatic bollards?
Telescopic bollards are manually operated with a key — you lift them up and lock them in place. Automatic bollards raise and lower at the push of a button or remote fob. Automatics cost more but are ideal for frequent use or mobility needs.
Do I need planning permission for a driveway bollard?
No — driveway bollards are classed as permitted development for residential properties. You don't need planning permission unless you live in a listed building or conservation area, where it's worth checking with your local council first.
How long does bollard installation take?
Most single bollard installations take 1–2 hours. Multiple bollards or automatic systems may take half a day. We handle everything from core drilling to fitting and testing — leaving your driveway clean and ready to use.
Are driveway bollards effective at stopping car theft?
Yes — driveway bollards are highly effective. They create a physical barrier that prevents vehicles from being driven away, even if a thief gains access to your car. Insurance-approved bollards like Sold Secure rated models are recognised by insurers as proven theft deterrents.
Driveway Bollards, Security Posts & Parking Protection Installed by Experts
We help homeowners across Kent, Essex, London, Surrey and Birmingham protect their driveways. Whether you need automatic bollards, telescopic bollards, or anti-parking posts, our team is here to help you make the right choice and get protected as soon as possible.

Telescopic Bollards
Secure your vehicle with our most popular option. Telescopic driveway bollards offer strong, discreet protection — manually operated, easy to use, and fully installed by our experts.
Automatic Bollards
Upgrade to keyless convenience. Electric bollards let you control access at the push of a button — perfect for driveways with multiple vehicles or frequent use.

Parking Posts
Stop unwanted parking. Our removable and lockable parking posts protect your space from nuisance parking, deliveries, or trespassers.
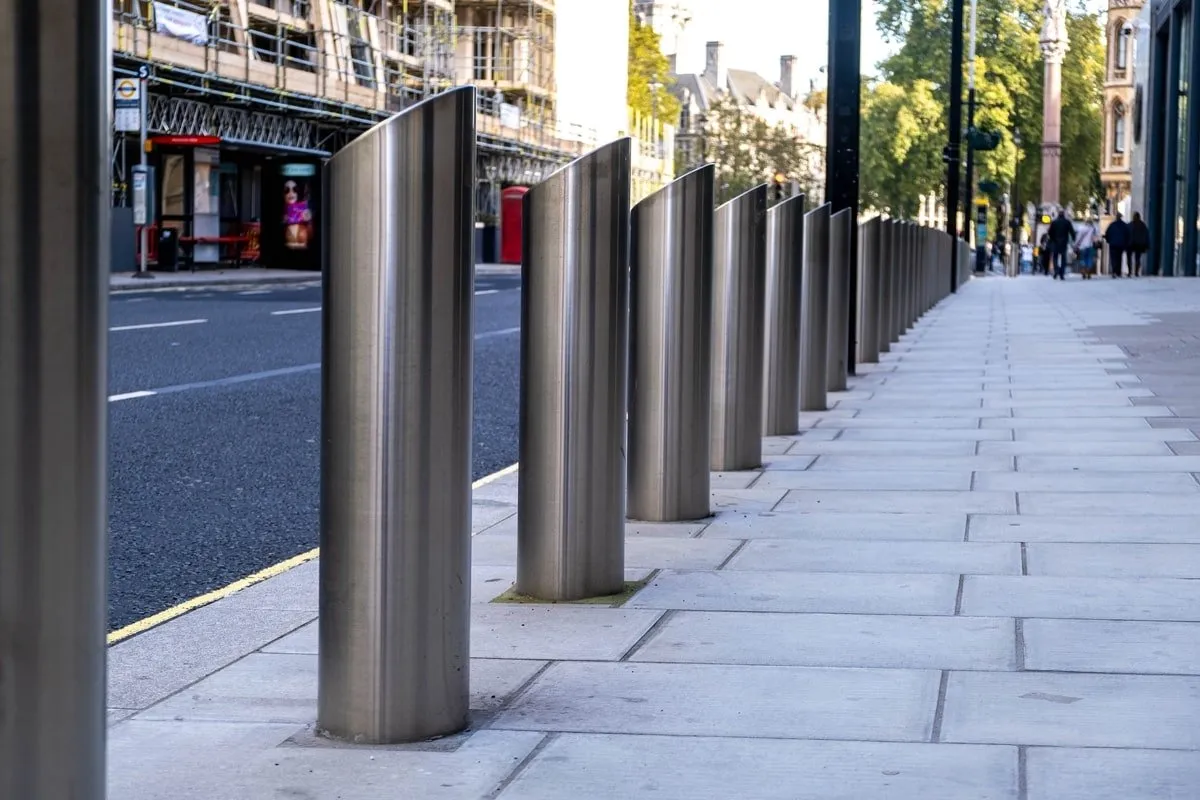
Static Bollards
Define and defend your space. Static bollards are ideal for preventing unauthorised access or protecting perimeters in high-traffic areas.
Driveway Bollards, Security Posts & Parking Protection Installed by Experts
We understand the importance of safeguarding your driveway. That’s why we offer a range of Driveway Security Bollards and Security Posts, designed to provide maximum protection and peace of mind. Whether you need a telescopic bollard for your private driveway or a more advanced solution for commercial properties, we have you covered.
Telescopic Bollards
Secure your vehicle with our most popular option. Telescopic driveway bollards offer strong, discreet protection — manually operated, easy to use, and fully installed by our experts.
Automatic Bollards
Upgrade to keyless convenience. Electric bollards let you control access at the push of a button — perfect for driveways with multiple vehicles or frequent use.
Parking Posts
Stop unwanted parking. Our removable and lockable parking posts protect your space from nuisance parking, deliveries, or trespassers.
Static Bollards
Define and defend your space. Static bollards are ideal for preventing unauthorised access or protecting perimeters in high-traffic areas.
Driveway Bollards, Security Posts & Parking Protection Installed by Experts
We help homeowners across Kent, Essex, London, Surrey and Birmingham protect their driveways. Whether you need automatic bollards, telescopic bollards, or anti-parking posts, our team is here to help you make the right choice and get protected as soon as possible.
Telescopic Bollards
Secure your vehicle with our most popular option. Telescopic driveway bollards offer strong, discreet protection — manually operated, easy to use, and fully installed by our experts.
Automatic Bollards
Automatic bollards are powered by electricity, allowing remote operation for enhanced security, shared access, and a higher level of convenience.
Parking Posts
Stop unwanted parking. Our removable and lockable parking posts protect your space from nuisance parking, deliveries, or trespassers.
Static Bollards
Define and defend your space. Static bollards are ideal for preventing unauthorised access or protecting perimeters in high-traffic areas.
Our Service Area
We provide expert driveway bollard installation and security post fitting across London, Kent, Essex, Birmingham and Surrey. Whether you're in a city centre or a rural area, our local team can reach you quickly. Use the map to check coverage or contact us for a fast, free quote.
Our Service Area
We provide expert driveway bollard installation and security post fitting across London, Kent, Essex, Birmingham and Surrey. Whether you're in a city centre or a rural area, our local team can reach you quickly. Use the map to check coverage or contact us for a fast, free quote.
Our Service Area
We provide expert driveway bollard installation and security post fitting across London, Kent, Essex, Birmingham and Surrey. Whether you're in a city centre or a rural area, our local team can reach you quickly. Use the map to check coverage or contact us for a fast, free quote.

The leading provider of vehicle protection solutions in the South East & Midlands.

Services
Contact
Wentworth Protection Limited
44A High Street, Addlestone, KT151TR
Company number 15430644
VAT Number 472069092
contact@wentworthprotection.co.uk

All Right Reserved © Wentworth Protection Limited - 2026
The leading provider of vehicle protection solutions in the South East & Midlands.
Services
Contact
Wentworth Protection Limited
44A High Street, Addlestone, KT151TR
Company number 15430644
VAT Number 472069092
contact@wentworthprotection.co.uk
All Right Reserved © Wentworth Protection Limited - 2026